Start replacement program in windows 10. Restoring the Start menu by editing the Windows registry
One of the main differences in Windows 10, noticeable to users, from previous versions, was the change in the interface of the operating system. We will tell you how to customize the Start menu in Windows 10 for yourself for comfortable work with the system.
Metro style: new implementation
The Windows graphical interface, dubbed Metro, replaced Aero a few years ago when Microsoft's mobile OS and Windows 8 desktop were introduced. Instead of glossy icons, the company introduced a new menu format consisting of rectangular tiles.
This interface turned out to be very comfortable for owners of mobile devices (smartphones and tablets) equipped with touch screens. But users of desktop PCs and laptops perceived the innovation ambiguously. Navigating the tiled menu with the mouse proved to be noticeably more difficult than using the touchscreen, and some people took the innovation with hostility.
However, given the growing popularity of touch screens in the laptop and desktop niche, we should expect the popularity of the Metro-interface to only increase.
The start menu is back
The start menu has been an integral part of the Windows interface for many years, but in 2012 it was decided to abandon its use in favor of the Metro desktop. Not everyone was satisfied with such an innovation, and in the latest version of their OS, Microsoft decided to return it, having improved it considerably.

There was a lot of debate about whether the Start menu in Windows 10 was needed, but most users were in favor of returning this interface element. It is not known whether Microsoft listened to the opinions of users, or was guided by ergonomics, but, one way or another, the modified Start menu is back.
The main difference between the new implementation of this interface element was the combination of classic menu items and live tiles. Customization options have also been expanded: now everyone can customize the Start menu for themselves.
Setting up a tiled interface in Start
Unlike classic icons that call applications, tiles are interactive elements. They can be used not only as a shortcut, but also serve to display relevant information from the application. This may be the weather forecast, the number of unread messages, foreign exchange rates, service notifications.
The functionality of live tiles in the new OS remained at the level of Windows 10, no visible innovations were made by Microsoft. To customize the tiles, just right-click on the icon. You can edit the size, color, turn animation on or off, send an icon to the taskbar, or remove an icon from Start.
Adding and removing new tiles
To add a new application tile, find it in the list of programs and right-click on its name. In the pop-up menu, select "Pin to Start Screen".

Similar operations must be performed to remove the tile, only you need to select the "Unpin from the home screen" item.

In order to change the location of the icon in the menu, you need to hold the tile with the right mouse button and drag it to the desired location.
Size setting
Users have the ability to change not only the location, but also the size of the tiles. There are several size options available for each icon. Depending on them, the functionality of the tile also changes: with a minimum size, the tile serves only to call the program, but when enlarged, it can also be used as an output element. How much information an icon can display, and in what format it will do so, depends on its size.
To resize a tile, right-click on it and select the Resize option.

Tiles can be rectangular or square. The larger it is, the wider the functionality, but on small screens, the loss of space can override any benefits from this.
A slight disadvantage of tiles is that if the size is set to small and the number is odd, there will be empty spaces in the menu. You can fix it by changing the size of individual icons and their location.
Prevent tiles from updating
It is quite convenient to receive various notifications from applications in real time. But sometimes developers pay too much attention to this feature, and as a result, the user is constantly distracted by insignificant program messages. To avoid this, the Start menu settings provide an option to turn off notifications from individual tiles.
To do this, right-click on the tile and select "Disable live tiles" from the pop-up menu.
After that, the tile design will always remain unchanged and annoying messages will stop bothering you.

Customize the colors of the Start menu
The watermark background in Windows 10 can be changed in the same way as the color of individual tiles. To do this, right-click anywhere not occupied by the icon and select the "Personalization" menu item.

In the window that opens, you can specify the background color in the Start menu, as well as change some other settings. You can choose for yourself not only the color, but also its saturation. The user can choose a ready-made color scheme, or customize it in detail to your taste on your own.

Pinning a program shortcut to the start screen of the Start menu
If you want to ensure the fastest access to an application or program in the start menu, you can fix it in the initial screen of the menu.
To do this, right-click on the desktop shortcut of the program or application you want. After that, a pop-up menu will appear where you need to click "Pin to Home Screen". Now you can open the menu and change the location of the created tile by moving it between groups.

Also for the newly added tile, you can set the name of the group in which it is located. There is also a reverse process, you can make a shortcut from any tile located on the home screen by holding the tile with the right mouse button and dragging it to the desktop.
Icons pinned to the left side of the Start can be easily removed from there, just press the right mouse button and select the option "Advanced" and "Do not show in this list".

Adding Special Elements
This feature is also present in Windows 10, but the principle of its operation is somewhat different from adding tiles. First of all, you should go to the Desktop, and then right-click on an empty space and select the "personalize" option. In the window that appears, select the "Start" tab at the bottom. In the dialog box that appears, you can find a list of items that can be added to the left half of the "Start".

Returning the Start Menu from Windows 7
Not everyone liked the updated interface of Windows 10. Some have long been accustomed to the old look of the OS, others simply do not like the tiled elements of Start. In this case, the developers have provided the ability to return the menu to the classic look familiar to everyone in Windows 7. You can customize the Start so that outwardly it will not differ from the previous version of the OS from Microsoft.
The easiest method to do this is to remove all live tiles. Disabling them in a couple of clicks, unfortunately, will not work, you will have to delete each of them manually. You can then change the width of the right side of the window so that it is collapsed.
The return of the Metro tile menu
Small screen tablet owners who are accustomed to the Metro menu may find the return of "Start" inconvenient on their device. Therefore, developers from Microsoft have provided the ability to manually activate the Metro start screen in the OS.

To do this, right-click on the taskbar and select "personalize" from the pop-up menu. In the window that opens, open the "Start" tab and enable the "Open the start screen in full screen" option. In the final build, Windows will no longer prompt you to sign in again, and you can enjoy the familiar Windows 8 start menu without restarting your PC.
What you need to know before upgrading to Windows 10
In addition to the attractive innovations that many users have already liked, the new OS is not without its drawbacks.
So, at the moment, full and error-free support for all devices that work perfectly under Windows 7 has not yet been provided. The inability to disable auto-update of the system in the usual way can also upset many users. Indeed, with limited traffic or low connection speed, downloading updates can result in additional costs or affect the quality of Internet browsing during the download period.
Those who do not like interference in his life may be alerted by the fact that the OS analyzes the user's behavior and collects information about it. This is done both to improve work and for advertising purposes, so many people are not happy with this approach.
So, when installing a new version of the OS, you should be aware of its features and take full responsibility for its unstable operation or the dissemination of information about the user.
Questions about how you can return to everyone the familiar windows 10 start menu as in Windows 7 are quite relevant when the computer icon does not appear on the desktop of a freshly installed OS after installation, and the modified Start menu is, to put it mildly, “not very”!
Returning the Windows 10 start menu like in Windows 7
It is not possible to return a full-fledged start menu to Windows 10 using the operating system, but you can change the appearance of the start menu to make it look like a normal one. For this:
Programs for creating a start menu
Classic Shell
This program is completely free and has Russian language. Its parameters can be customized to your taste and apply different themes. 
start 10
This is a product of Stardock, which specializes in developing applications for Windows appearance changes. You can use Start10 free 30 days. Its installation takes place in English, but the interface itself has support for the Russian language. The application is able to set not only the color, but also the texture for the start menu. 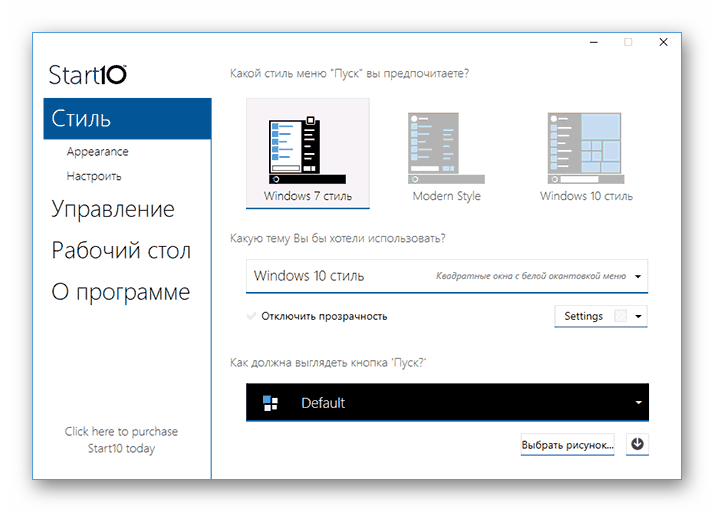
StartIsBack++
This program also has a Russian-language interface, and it is provided free use for 30 days. StartIsBack++ changes not only the menu itself, but also the taskbar. 
How to return the My Computer icon to the Windows 10 desktop
To enable the computer icon on the new system, you will need to right-click on the desktop and click Personalization
.
Then:


now icon My computer will be placed on the Windows 10 desktop, only it will be called This computer, but the name can be changed.
With this quick guide, you will be able to return the MY COMPUTER icon and the windows 10 start menu like in Windows 7
After upgrading to Windows 10, many users became disillusioned with the modernized Start menu. In Windows 7, it consisted of two parts: the left one - previously used programs, the right one - My Computer, Control Panel, and other elements for configuring and managing the system. To return the classic look of the Start menu in Windows 10, just follow some tips.
Ways to Bring Back the Classic Start Menu in Windows 10
In order to make the Windows 10 Start menu look like the classic Windows 7 menu, it's worth removing all Metro tiles. To do this, perform the following steps.
- Right-click on the element and select "Delete".
- In this way, we remove all the tiles until we get the classic look of the menu.

You can return the classic look of the Start menu in Windows 10 using the ClassicShell program, which runs in compatibility mode.
- Download and install the program. Select components to install. In this case, we need "Classic Start Menu" and "Classic Explorer". The latter modifies Explorer. You can also return the old look of the Control Panel, which in Windows 10 is not too different from the IE browser. Choose a location for storing the program folder and click "Next".

- Follow the prompts of the installation wizard. After completion, click on the Start button. A new settings window will appear. Select the element model.

- The Start menu will look like this.

- All elements on such a menu can be swapped, the size and other parameters can be adjusted.
- The explorer will get the following view.

- The control panel will not be too different from previous versions of Windows.

Using the Options menu, you can also make the button and the Start menu look classic. To do this, we perform the following.
Microsoft's experiment with the Start menu in the previous version of the OS failed, so in Windows 10 we got Start as standard. However, many people want to return the familiar look back, for this you can download the Start menu for Windows 10.
Peculiarities
The program that we offer you to download and install on your computer or tablet has been tried by thousands of people. And we got extremely good feedback on this start menu build, so we tested it ourselves, and then posted it for you. With this utility, you will be able to:- Restore the familiar Start menu;
- Manipulate the location of programs and shortcuts;
- Get access to the search bar;
- Can you restore the usual;
For those who are used to the classic look of the Start menu, it is possible to customize this menu a little without installing third-party programs. But it is third-party programs that will allow you to make it look like Windows 7. With the release of Windows 10, the popularity of the program for the Start menu fell, because in Windows 8 this button did not exist at all and it was extremely important for users to return it somehow. But it did not fall by 100%, but only partially, since some still want to get exactly the old version of the menu.
After you download this small file (about 6 Megabytes) and install the program, you will have a Start button and it's completely free. It doesn't matter what language your Windows 10 is in, or in English, it doesn't matter for the button. The menu will be in the language of your system. And it doesn't matter what bit depth (x32/x64) your OS is, or what device you use it on. The question of the convenience of the start button on tablets with a small screen is purely individual, but on computers this button will definitely take root.
Hello my dear friends.
Many of my readers ask me how you can change the start, in the tenth Windows, so that it is more familiar. It cannot be completely changed due to technical limitations, but today I will tell you what can help in this case. The topic of the article is setting up the windows 10 start menu, for easier and more ergonomic work at the computer. So let's go!
Styling under the seventh Windows
So, to configure the start as in windows 7, we need such a soft shell as the classic shell. Download it from here. Install and run. We will need a software module called Classic Start Menu. On the first page, we choose the style of the menu itself.


Now go to the cover selection tab and select the one you want.


After pressing the OK button, the screen will blink several times and the start menu will be the same as in the seventh Windows.
Configuration via StartIsBack++
So that we do not touch gpo (Group Policy Objects), we use this software. Download it from here. After installation, click on the settings button and go to the start menu appearance editor.
By the way, in this software, you can even change the button itself.


Under this menu there are switching options, there we select everything at our discretion. Next, we go to the additional block and set everything there as I have at the peak from below.


Everything, our customized menu is completely ready.


If you want even more customization, then you should purchase the pro version.
How to remove all applications from the menu?
Now I will tell you how to remove the application list. Go to the settings of our Windows and click on the personalization tab with the cursor.


Go to the start block and turn off the switch that I highlighted with a rectangle in the picture.


If everything is fine, then your launch will be something like this.


All apps have been removed.
Conclusion
Of course, you can try to customize the start menu through the registry. However, due to a lack of knowledge, you can cause more problems than you can achieve positive results. If you get error 1703 in the process of changing the menu according to the last advice, then the distribution kit of Windows itself is simply not suitable. In this case, download another one and reinstall.
By the way, here's a great video on the subject
Well, with that, I'll say goodbye. I hope you share this article with other users and your friends on social networks. It's free and by doing so you will not only do me a great favor, but also help people who are interested in this topic. And also subscribe to updates of my site, and you will always know about the publication of my new articles. Well, that's all! All the best to you and see you in the comments to the materials on my site! See you!